How to Install USB Wall Outlets
The electrical outlet is one piece of home technology that has remained pretty much the same for the last several decades. While international travel may be a different story, you know what you’re going to get when you go to a friend’s house and need to plug in your phone: A standard 125-volt, 15-amp outlet with two vertical slots and a U-shaped hole for grounding.
The best thing about the standard wall outlet is that everything is made to plug right into it. However, that’s also one of their biggest inconveniences. When you have two phones that need to be charged, plus a lamp, something is going to have to wait — and unless you like fumbling around in the dark, it probably won’t be the lamp.
USB wall outlets are one of the most overlooked modern conveniences you can add to your home, and it’s simple enough that even a beginner can complete the process with confidence. We’ll cover everything you need to know about the best ways to install a USB wall outlet so you can simplify your charging setup.
What is a USB Wall Outlet?
A USB wall outlet is a step up from the standard outlet. It adds USB charging capabilities to the wall without the need for an adapter. When you have a phone and a tablet that both need to be charged, you normally have to take up both spaces in a standard outlet. This is because your USB cables need to run through an adapter to receive the right amount of power from the wall.
When you think about it, all the areas where you might want to quickly charge your phone, tablet, smartwatch or other devices are usually very high-traffic. Whether you need to top off your tablet while you enjoy a coffee in the kitchen, or need a spot on your nightstand to charge multiple devices, it feels like there are never enough outlets.
No matter the brand or device, adapters are always annoyingly bulky and tend to take up more space than you want them to. The solution to crowded outlets is the USB wall outlet — a device that adds two or more USB charging ports directly to the wall while maintaining at least one of the standard AC plugs.
A USB wall receptacle can have two standard outlets with a maximum of three USB ports incorporated alongside them. The most common setup is two outlets with two USB ports, though some models eliminate the second standard plug in favor of USB ports. There are many combinations, but any USB wall outlet accomplishes the goal of giving you more usable USB ports that eliminate the need for adapters.
Are USB Wall Outlets Safe?
The answer is “yes” — as long as they are Underwriters Laboratories (UL) listed and installed correctly. It’s important to note that you should not replace a ground fault circuit interrupter (GFCI) outlet with a USB outlet unless it is protected on the same circuit as the GFCI receptacle. Your GFCI outlets are the ones that have “Test” and “Reset” buttons, and they’re usually found in rooms with water sources like your kitchen and bathroom.
These more advanced outlets detect abnormalities in the flow of electricity and shut off the power before rogue currents can cause trouble. If you plug a hair dryer into a non-GFCI outlet and there’s an interruption in the current, you might get a nasty shock. A GFCI outlet is capable of detecting a difference in current flow as small as 0.006 amperes and can interrupt power within milliseconds. For safety reasons, steer clear of replacing GFCI outlets with USB outlets.
Brand Compatibility
The other concern people may have is using non-branded equipment to charge their devices. Device manufacturers warn that using off-brand chargers can cause serious damage to your device and battery, and research shows this warning is true — among generic and off-brand Apple iPhone adapters, 99% fail basic safety tests. What does this mean for the safety of USB wall outlets?
Today’s USB outlets are equipped with smart chips, such as TOPGREENER’s Intellichip, that sense how much power a device needs to achieve a full charge, which generic adapters do not have. High-quality USB outlets are also tested and listed by UL or Edison Testing Laboratory (ETL) to ensure their safety, so you don’t need to worry about plugging your favorite high-end devices into a USB outlet as long as you continue using the cable recommended by your device manufacturer.
Installation Safety
If you’re a little nervous about the idea of installing a USB wall outlet, you’re not alone. If you’re not particularly handy or belong to a younger generation who never took shop or home economics, the concept of fiddling around with electrical wires can seem intimidating.
Luckily, learning how to install a USB charging receptacle is an achievable goal as long as you take the time to follow the instructions carefully and thoroughly. In most cases, you’ll only be dealing with a few wires and just a couple of tools, making this a great project for beginners willing to put in the time and attention learn the proper procedure. When it comes to working in an area you’re unfamiliar with that is potentially dangerous — especially something as technical as wiring an outlet — hire an electrician to do the job for you.
How to Install Your USB Wall Outlet
If you’re ready to enjoy the benefits of installing a USB outlet, you’ll need to first get some tools in order. Here’s a list of everything you’ll need to follow this easy USB wall outlet installation guide:
- USB receptacle
- Decorative wall plate
- Phillips screwdriver
- Flathead screwdriver
- Needle-nose pliers
- Outlet voltage tester
- Wire stripper
The wire stripper may not be necessary to complete the project in your case, but it’s better to have it on hand than to interrupt the installation to get it. To speed things up, you may also want to add a cordless drill to the toolbox in addition to the screwdrivers. Once you have everything together, you’re ready to get started.
Follow these steps to install a USB wall outlet:
1. Turn Off the Power
Head to the breaker box and turn off power to the outlet you intend to replace. Some homes have electrical panels that are poorly labeled or disorganized, so there might be some trial and error in figuring out which switch to flip for which room. If you’re not entirely sure you got the right switch or want to be as safe as possible, just turn off the electricity altogether. Always be sure to check the outlet with the voltage tester before continuing.
2. Remove Wall Plate and Old Receptacle
Once you’ve determined the power is off, you can carefully remove the receptacle cover using the flathead screwdriver. Underneath, you will see the outlet connected to the wall with one Phillips head screw at the top and one at the bottom. At this point, you can bring out the drill to remove the screws quickly or take the scenic route with a screwdriver.
Gently pull the receptacle out of the wall before moving on to the next step.
3. Take Note of the Wiring
It’s a good idea to take note of the current wiring before disconnecting it, and consider taking a picture for reference later. The setup is probably very simple, but if you’ve never worked with wiring before, it can increase your confidence and make the process go faster overall.
Many standard outlets have just three wires: The neutral wire which is white or grey, the hot wire which is black, and the ground wire which is typically green or bare copper. The power comes from the hot wire, which provides the 125 VAC current. The neutral wire is the return path for the hot wire’s current. The ground wire is a safety feature, in case either the neutral or hot wire comes in contact with metal.
If you’re worried about mixing them up for any reason, consider labeling the wires before you remove them. A couple of small sticky notes can eliminate any potential confusion.
4. Disconnect Wiring From the Old Receptacle
At this point, you can use your Phillips head screwdriver to remove the retaining screws that hold the wires in place. Any sequence will do. In some outlets, the wires are fixed in place with quick-release clamps instead. These clamps have a recessed button for release, so you’ll need a smaller screwdriver or something similar to press the button.
To make connecting the new outlet easier, use your needle-nose pliers to straighten out the wires after you remove the old outlet.
Once the old outlet is disconnected, you’ll need to figure out what to do with it. As long as the outlet was functioning when you removed it, you can likely donate it. If it’s non-functional or your local thrift store isn’t interested, you should investigate local recycling options to dispose of the old outlet.
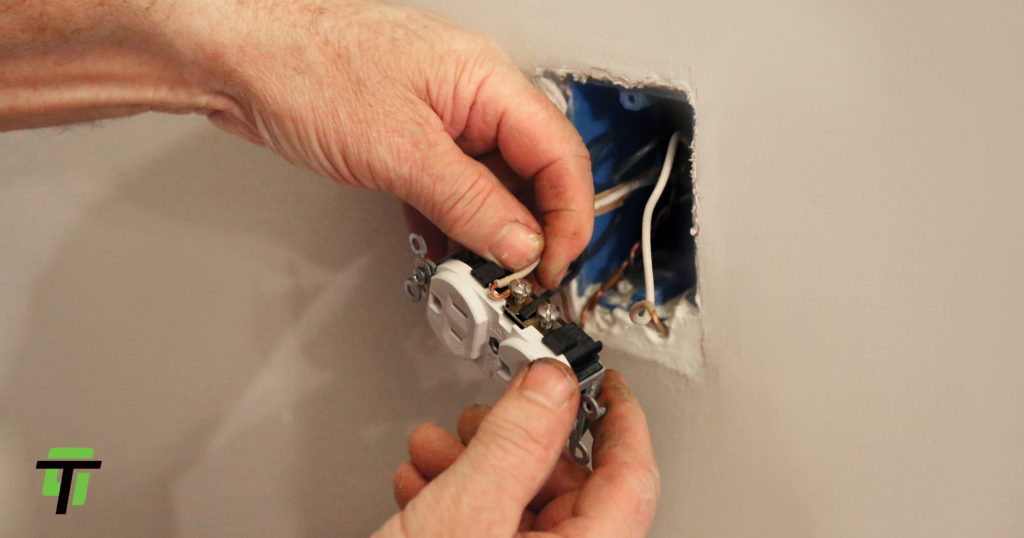
5. Connect the New Receptacle
Not every USB wall receptacle looks the same, so be sure to follow the instructions that come with your new device. In many cases, manufacturers help you out by color-coding the screws so you can match them to the correct wires by sight. Note that it’s often best to connect the ground wire first, because it can orient the receptacle and make it easier to connect the subsequent wires.
Once you’ve inserted each wire, carefully turn the corresponding screw clockwise to tighten the connection.
6. Secure the New Receptacle and Wall Plate
After you’ve connected all wires to the receptacle and tightened them, place the receptacle back into the wall box. Depending on the depth of your wall box and how much excess wiring you have, this might be a tight fit. Some minor adjustments or shortening of the wires should help. You will use the two Phillips head screws to secure the new outlet firmly to the wall. The connection shouldn’t be too tight, but you shouldn’t be able to wiggle the receptacle at all.
Next, attach the wall plate to the outlet with a flathead screwdriver.
7. Test and Enjoy
Now it’s time to flip the power back on and make sure everything went according to plan. Plug a USB device into your new wall charger and make sure it’s receiving power. Some outlets offer a visual cue in the form of a colored LED light that turns on when the outlet is receiving power or when a device is plugged in.
If your device is charging as expected, you’re good to go. If the device is not charging, you should go back and ensure all the wires are in the right spots and tightened correctly.
Benefits of Installing a USB Outlet
After having your new USB outlet for a while, you’ll notice that it really makes a difference in your everyday life. The more outlets you upgrade, the more you’ll notice the following benefits of USB wall chargers:
- Convenience: Right off the bat, you’ll start to realize just how much time you’ve wasted trying to charge your devices with the old adapter-plus-cord setup. The biggest difference is that you won’t need to unplug the coffee-maker or bedside table lamp just to charge your device for a few minutes.
- Clutter: Many homes only have the minimum number of electrical outlets they can get away with, and that often means a mess of extension cords. A USB wall outlet can eliminate one or more extension cords that make your home look more cluttered than it is.
- Safety: Not only are numerous extension cords an eyesore, but they can also be dangerous. The small extension cords used to power devices can cause fires if overloaded. USB outlets have safety features to counteract this danger.
There are no real downsides to having a USB outlet in your home. They’re an extremely affordable way to get the most value out of your existing electrical system.
The Best Location for USB Outlets
One of the best USB wall outlet installation tips is to pick the optimal spot for the new outlet. If you’re not sure where to start, here are all the parts of the typical home that could be suitable for a USB wall outlet:
- Living room: In many homes, the living room is the hub of activity and often has far fewer outlets than a family needs. A USB outlet provides much-needed extra charging capability and can centralize your charging station.
- Bedroom: If you’re satisfied with the number of outlets in your bedroom, you’re among a happy few. Installing a USB charging receptacle in your bedroom can reduce stress and eliminate squabbles between partners over who gets to charge which devices and when.
- Home office: The average home office has several devices that need to be plugged in constantly — like PCs, printers and monitors. Add that to the need for phone charging, and you have an ideal area to add extra charging capability with a USB receptacle.
- Kitchen: As long as you keep an eye out for GFCI outlets, the kitchen can be a great place for a USB outlet. You can plug in your devices while prepping food or eating a quick meal, and the kitchen is often a natural spot for guests to recharge.
- Garage: Garages may get a lot of foot traffic, but your family probably doesn’t hang out there very often. Then again, maybe you have a workshop where you utilize a device for viewing instructions or for distraction while working. A USB wall outlet could do some good in your garage.
Think about where you spend the most time with your smartphone and tablet. If all you do is check the news and watch a show before bed, the best spot for you is likely the bedroom. If you’re a power user with the couch as your home office, a living room USB outlet is the way to go. Kitchen crusaders know how annoying it is to have to run to the living room to check their charging devices and would do best with a USB outlet near their favorite counter top.
Of course, you don’t have to limit yourself to just one USB outlet. In fact, once you install one, you may find that you could benefit from more.
Types of USB Wall Outlets
Not every USB outlet is built the same, so it’s important to know exactly what type you need. TOPGREENER, your source for affordable home automation solutions, offers four types of USB wall outlets to suit your needs:
1. USB-A Outlets
USB-A is still the most common type of connector used in device cables today. This connector is the square you see at the end of your phone charger that plugs into the adapter. USB-A outlets are the most affordable and are available in a variety of setups, all the way up to three USB ports with a single 125V outlet. Many people choose the two plug and two port option for the greatest convenience.
Our outlets feature Intellichip technology, which determines a device’s power needs to deliver optimal power without overheating or overcharging.
2. USB-C Outlets
Early tech adopters know the newest sensation in device charging and data transfer is the USB-C connector. With these ports, you get faster charging and the benefit of reversible connectors. TOPGREENER carries USB-C outlets that have dual Type-C ports or a combination of Type-A and Type-C ports. The combination outlet is perfect for households that have a mix of older and newer devices. Like our Type-A outlets, our USB-C outlets safeguard your devices with Intellichip technology.
3. Quick Charge Outlets
A number of newer devices offer Qualcomm’s Quick Charge capabilities. If you have one, you want to take full advantage of the lightning-fast charging speeds — and our Quick Charge outlets are the perfect way to do so. In either a dual Type-A or combination Type-A and Type-C ports, these outlets can charge an enabled device up to 80% in 35 minutes or less.
Our outlets support devices with Qualcomm’s latest Quick Charge 3.0, but they also support Quick Charge 1.0 and 2.0. In addition to the backwards compatibility, these outlets can charge standard devices as well. If you have even one device that can use Quick Charge, these outlets are for you.
In terms of safety, the Quick Charge 3.0 protocol prevents damage from overcharging. These outlets also utilize Intelligent Negotiation for Optimum Voltage (INOV), allowing for a blend of maximum power and charging efficiency.
4. Power Delivery (PD) Outlets
Power Delivery is the new standard for fast-charging via USB-C. Outlets with Power Delivery work much like Quick Charge ports do for cables with USB-A connectors, and can charge devices in a fraction of the time thanks to their ability to modulate the amount of power to fit the needs of each device. The latest Google, Samsung, and Apple smartphones all have Power Delivery built in.
TOPGREENER offers outlets and adapters featuring Power Delivery, some of them also including a second port with Quick Charge capability. If you intend to purchase any new devices in the next few years, you’ll benefit from outlets with Power Delivery.
TOPGREENER: Your Smart Home Source
USB outlets provide a quick and affordable way to make your home more livable, and they’re an essential feature for any smart home. With so many options available to suit your needs, you can find the ideal USB charger at TOPGREENER. We take safety seriously and ensure that all our products are approved by UL or ETL, so you can confidently modernize your home.
In addition to our selection of USB wall outlets, TOPGREENER offers a wide variety of home automation solutions that can bring your household into the 21st century. If you have questions about our products, what they do or how they work, we invite you to reach out through our contact form. As an extra layer of convenience, we also offer our full line of products through the TOPGREENER Amazon Store. We’re excited to be your choice in making your smart home dreams a reality.
Sources:
- https://www.cpsc.gov/s3fs-public/099_0.pdf
- https://library.ul.com/wp-content/uploads/sites/40/2016/09/10314-CounterfeitiPhone-WP-HighRes_FINAL.pdf
- https://www.ul.com/
- http://www.intertek.com/marks/etl/
- https://topgreener.com/wall-plates
- https://www.cpsc.gov/s3fs-public/5032.pdf
- https://topgreener.com/usb-charger/in-wall
- https://topgreener.com/usb-charger/in-wall/usb-a
- https://topgreener.com/usb-charger/in-wall/usb-c
- https://topgreener.com/usb-charger/in-wall/quick-charge
- https://topgreener.com/home-automation
- https://topgreener.com/contact-us
- https://www.amazon.com/stores/TOPGREENER/TOPGREENER/page/49931304-6B5C-45A4-B55C-D7A0E205E9D8
I have a TOPGREENER TU2154A-W installed on a GFI circuit. When the GFI trips and is reset, the USB outlets/connectors are not re-energized; the standard outlets work fine. Does the device have a reset somewhere that must be reset?
The USB outlets may have been damaged by the fault. The internal components are different than that of a regular outlet and contain a pcb and other sensitive components. Please reset the breaker and test the device again. If you are still having issues with the device please contact us so we can further assist and provide a solution.
Can I install this outlet to replace an outlet with two black and one red hot wires? If so, where do I attach all three of these hot wires?
Hi Lisa,
Good question! If you’re familiar with how a standard switch is wired, you’ll be able to easily install a USB outlet. There is no special wiring necessary. In regards to your specific wiring situation, we always advise that you reach out to an electrician for more guided assistance.
Do you have outlets with USB that can be wired “half hot”, with one outlet controlled by a light switch? I have TU2153 and TU2154 but both are single pole.
Hi Ruth,
That’s a good question. All of our USB models are built the same way in regards to single-pole applications. However, if you’d like to contact our customer service department, a technician may be able to help you find a solution or a work-around. You can reach our customer service team Mon-Fri, 8am-4pm PST. Contact them directly at 844-390-2568 or via email at support@topgstaging.wpengine.com.
Pingback: Can I Replace A Regular Outlet With A USB Outlet? – Almazrestaurant
Hello. I installed and went to turn in the breaker and it kept tripping. House built in 98; junction box may be too small? Can you shed any light on this? I uninstalled and put back old standard outlet and not trip. Thank you.
Hi Alan,
Please contact Tech Support for further assistance. You can reach them at support@topgreener.com.
Thanks,
Jared